What scale actually does inside the machine
Tap water arrives carrying dissolved calcium and magnesium. Heat changes that. Once the water is hot enough, those minerals come out of solution and settle as carbonate scale on the hottest surfaces they touch: the boiler or thermoblock walls, the heating element, valves, level sensors, the group passages, and the inside of the steam wand.
Scale is not a thin stain you can wipe away. It builds in layers, and it does two expensive things at once. First, it insulates. A heating element coated in scale has to push heat through stone before the water warms, so temperature control gets sluggish and uneven, and shots start tasting dull or scorched depending on the machine's mood. Second, it narrows the path. Passages that were meant to carry water at a steady rate now resist it, so the pump works harder, flow at the group drops, and pressure at the puck becomes inconsistent.
That is why the early warnings are about behavior, not appearance: shots that suddenly run fast and blond or slow and bitter, steam that used to hiss and now sputters, a pump that sounds strained, hot water that trickles, or a descale indicator that lights up after months of normal use. You cannot see any of it from the outside, which is exactly why the water path needs a periodic acid flush rather than a visual inspection.
How to tell scale from coffee oils and a backflush problem
Three different kinds of dirt cause three different problems, and treating one as another wastes an afternoon. Scale lives in the water path. Coffee oils live where coffee touches: the group screen, basket, portafilter spouts, the brew unit, the drip tray. Backflushing is a cleaning action for machines with a three-way solenoid valve, not a descaling action.
What you notice | What it usually is | What actually fixes it |
|---|---|---|
Flow at the group slows over weeks, steam weakens, the descale light comes on | Mineral scale in the boiler, thermoblock, or steam path | A descaling cycle with a descaler, followed by a full rinse-through |
Shots taste flat, rancid, or muddy; dark residue on the shower screen; sticky portafilter | Coffee oils and old grounds | Detergent cleaning of the group, basket, and screen; backflush if the machine supports it |
Pressure gauge behaves oddly, water backs up at the group, dirty water flushes out of the valve | Three-way valve and group passages clogged with oils and fines | Backflush with detergent and a blind basket, on machines designed for it |
Water tastes metallic or sour even when hot, before any coffee | Scale or a spent water filter | Descale, and replace the filter on its own schedule |
A useful check before you start: run a shot of plain hot water through the group into a cup and taste it. If the water tastes sour, chalky, or metallic on its own, the problem is in the water path and descaling is the right move. If the water tastes clean but the coffee tastes stale, you are looking at oils and grounds, not minerals.
Also treat the descale reminder as a prompt, not a diagnosis. Many machines count liters or cycles rather than measuring scale, so the light can appear early in soft water or late in hard water. Your flow and taste observations are better evidence than the light alone.
Before you start: what to unplug and what to protect
Descaling uses a mild acid, and acid is careless around three things: skin, stone countertops, and electronics.
- Unplug the machine, or switch it off at the outlet, before you remove the reservoir or move anything. Let it cool enough to handle safely.
- Take out the portafilter, basket, and any water filter in the reservoir. Most filters are ruined by descaler, so they come out before the cycle and go back in after.
- Work near a sink, or set the machine on a towel with the drip tray empty. Marble, quartz, and other polished stone can etch if descaler sits on them, so wipe splashes immediately with clean water.
- Read the descaler label and the machine manual together. Some machines specify a particular descaler and warn against vinegar or other improvised acids because of seals and metal parts. When the manual is specific, follow it.
- Ventilate the room, keep the solution off your skin and out of your eyes, and never mix descaler with bleach or another cleaner. Keep the whole job away from children and pets.
- Have more clean water ready than you think you need. The rinse is the part people cut short, and a short rinse is why machines taste sour afterward.
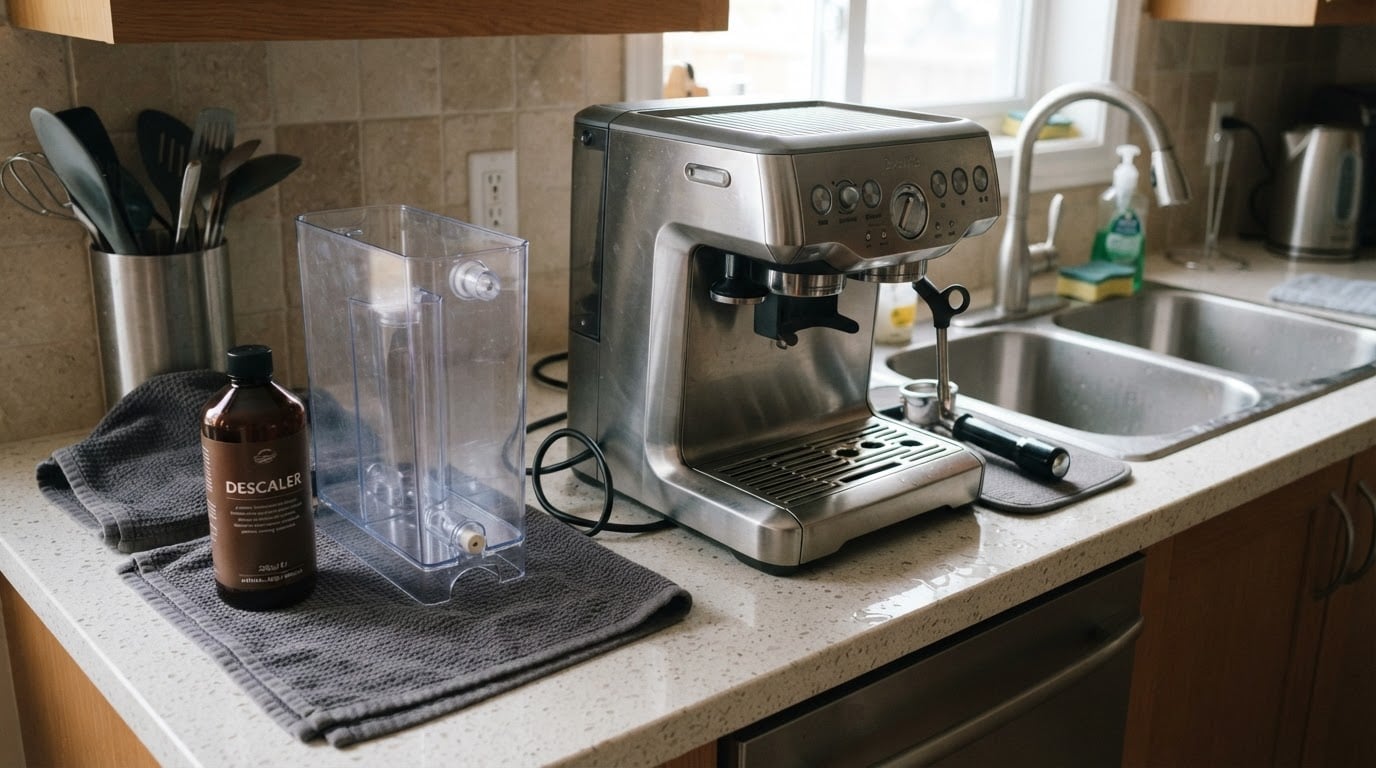
Reservoir semi-automatic machines, step by step
This is the common countertop setup: a removable water tank, a group head, a steam wand, and no automatic program to hold your hand.
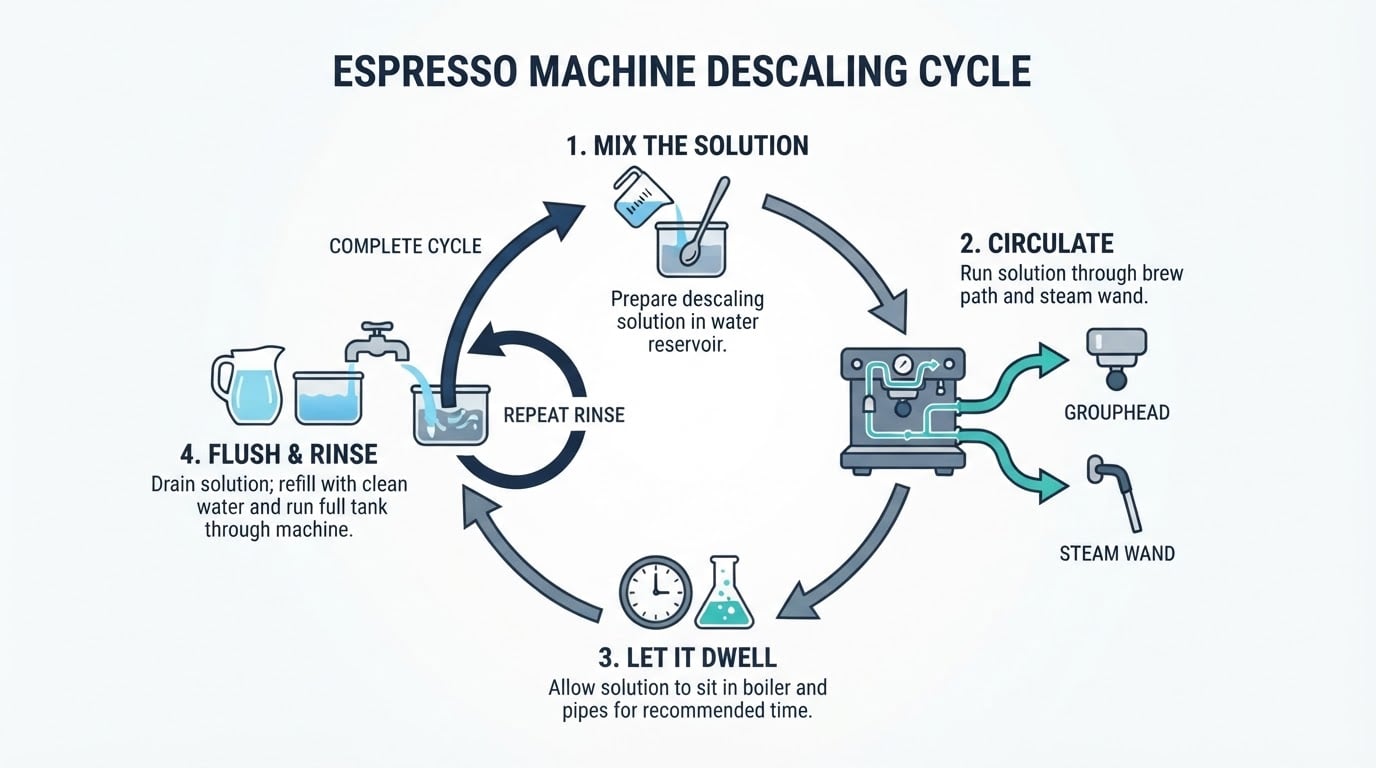
- Empty the reservoir completely, remove the filter if there is one, and rinse the tank. Fill it with fresh water to the level the descaler label specifies.
- Add the descaler at the dilution on its label. Do not improvise a stronger mix; more acid does not remove scale faster, it just stresses seals and takes longer to rinse out.
- Turn the machine on and let it come up to temperature. Then run the solution through the group in short bursts, a few seconds at a time, alternating with short bursts through the steam wand or hot-water outlet. The goal is to wet every path the water uses, not to empty the tank in one go.
- Pause and let the solution sit in the water path for the dwell time on the label. Keep the machine warm if the manual says to, but never let it run dry or overheat.
- Empty the reservoir, rinse it thoroughly, and refill with clean water. Discard the used solution; it is spent and full of minerals.
- Now the rinse-through. Run the full reservoir of clean water through the group and the wand, in bursts, then refill and do it again. Two full clean-water passes is a reasonable floor; add a third if you can still smell acid in the water.
- Refit the water filter, prime the machine as the manual describes, and pull one shot straight into the sink. That first shot is rinse water, not coffee.
- Taste plain hot water from the group. Neutral means you are done. Sour or vinegary means one more rinse pass.
Super-automatics with a guided descale program
Machines with a screen usually run the cycle themselves: they pulse the pump, time the dwell, and refuse to brew until the rinse finishes. Your job is to prepare the machine and not interrupt it.
- Clear the grounds container and drip tray first. A full container mid-cycle is the most common reason a program aborts.
- Remove the water filter if the manual calls for it, and make sure the reservoir is filled to the marked descale level.
- Put a large enough container under the spouts, or route the outlet to the sink if the machine allows it. Descaling discharges a lot of liquid.
- Start descaling from the maintenance menu and follow the prompts. Do not pull a shot, open the brew unit, or unplug the machine while it runs.
- Expect the rinse stage to be longer than the descaling stage. Let it finish completely; many machines will not return to normal brewing until the full rinse is confirmed.
- When the program ends, refit the filter, run a plain-water rinse or test brew, and clear the descale reminder if the machine asks you to confirm it.
If the program stops halfway, the machine will usually let you restart it. Restart from the beginning with fresh solution rather than topping up a half-finished cycle with water, because you lose track of what has actually been rinsed.
Pod machines: a short cycle that is easy to under-rinse
Pod brewers scale just as readily as espresso machines, and their small water paths mean scale shows up as weak flow fast.
- Leave the pod chamber empty and remove the water filter if one is fitted.
- Fill the reservoir with water and descaler at the label's dilution, then start the machine's descale mode.
- Run the solution through the brew outlet in short bursts, and through the hot-water or steam outlet if the machine has one. Alternating outlets is what gets the whole path, not just the brew head.
- Empty and rinse the reservoir, refill with clean water, and run at least two full rinse cycles. Small boilers hold onto acid, so the second pass matters here more than on a larger machine.
- Run one throwaway brew with no pod, then wipe the outlet and drip tray. Return the filter and reset the descale light if your model has one.
If you do not have a kit: the mild-solution and plain-water route
You do not need a branded kit to descale, but you do need a controlled acid and an honest rinse.
Use a mild descaling solution made for coffee equipment, diluted exactly as its label says. Food-grade citric acid solutions are the usual alternative when a machine's manual allows them. Vinegar is the improvised option people reach for, and it does dissolve scale, but it lingers in seals and tubing, and some manuals explicitly warn against it for particular boilers and metals. If your manual forbids vinegar, that settles it. If it allows vinegar, use plain white vinegar diluted with water, keep the dwell short, and add an extra rinse pass.
The method is the same as above: solution through every water path, a dwell within the label's guidance, then flush the reservoir and run clean water through the group, wand, and hot-water outlet until the water has no smell and no taste. Three passes with clean water is the safe default. A longer rinse costs you a few minutes; a short one costs you the next week of coffee.
The completion standard is simple and worth stating plainly: clear water flowing at its normal rate, no acid smell in the tank or the cup, steam back to its usual strength, and a shot that behaves like it did before the scale built up.
How you know the descale worked
Do not judge by the descale light alone. Run these checks in order:
- Flow: time a shot of water through the group and compare it with what the machine did when it was clean. If it is still crawling, the scale was heavy and may need a second cycle after a rest.
- Temperature behavior: the machine should hold temperature without the wild swings you saw before. Recovery after steaming should feel normal again.
- Steam: a descaling that skipped the wand leaves scale exactly where the milk gets wet. Steam should come back strong rather than sputtering.
- Taste of plain water: neutral, not sour, not metallic. This is the clearest signal that the rinse was sufficient.
- First real shot: discard the first one after descaling regardless. Judge the second and third, and expect the grind to need a small adjustment, since clearing scale changes flow through the puck.
If the cycle stalls, the machine errors, or the next shots taste wrong
Most post-descale problems fall into a few predictable patterns.
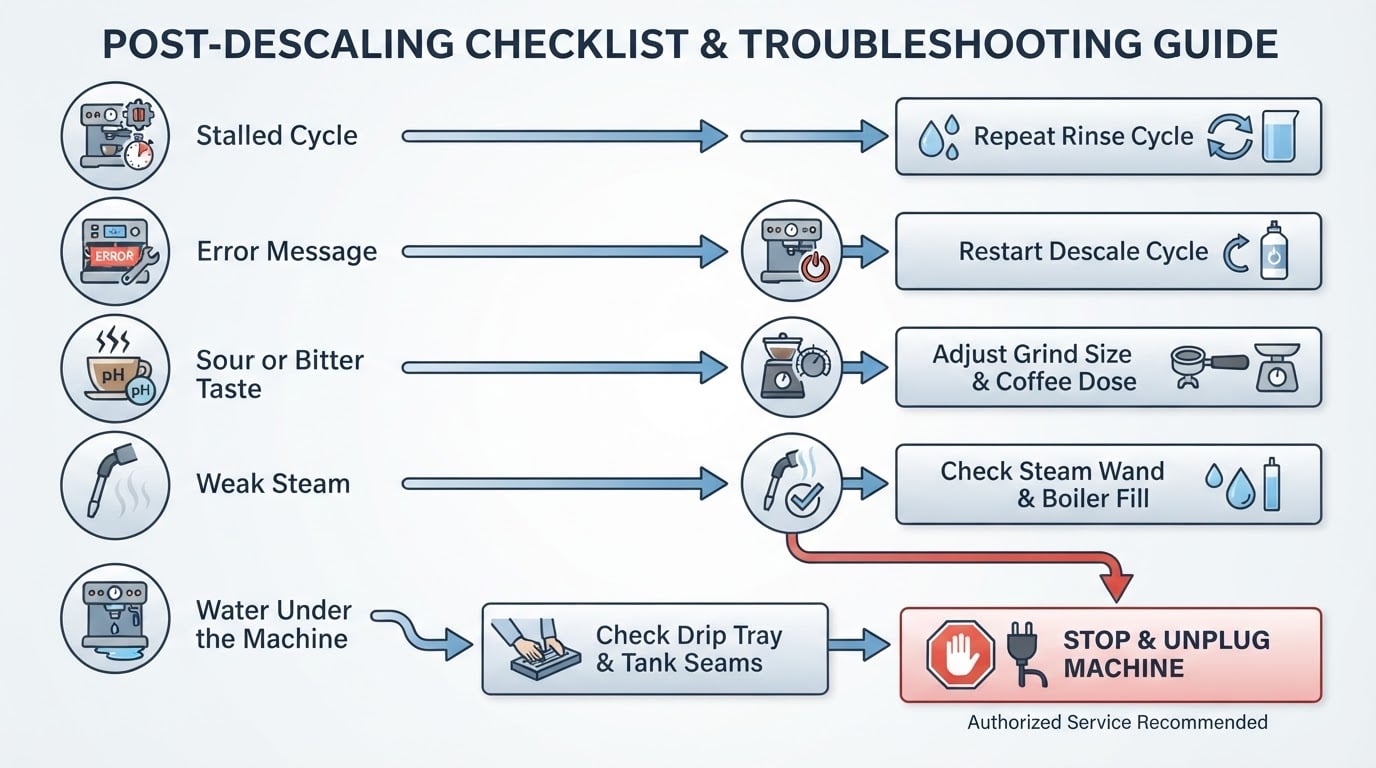
- The cycle stops midway. Switch off, let the machine cool, and restart the program from the beginning with fresh solution. Do not reuse what came out, and do not leave acidic solution sitting in the machine overnight.
- An error appears after descaling. The usual cause is an unfinished rinse or a reservoir sensor reading low. Refill, run the rinse stage again, and confirm the tank is seated properly.
- Shots taste sour or bitter afterward. Sour usually means not enough rinse or a grind that is now too coarse for the improved flow; bitter usually means the grind is too fine or the group is still dirty. Rinse again, then adjust the grind one step at a time.
- Steam is still weak. The steam path was not fully included. Run solution through the wand briefly, let it dwell, then rinse, and soak the tip if it is removable.
- Water appears under the machine. Stop, unplug it, and do not brew. Liquid at the base after descaling can mean a seal or a reservoir connection, and that is a service job rather than a repeat cycle.
- The descale light will not clear. Some machines only reset after a completed rinse cycle or a manual confirmation in the menu. Check the manual's reset step before assuming the descale failed.
Where a ready-made maintenance guide saves you time
The method above works on almost any machine, and the slow part is usually not the descaling itself. It is working out which cycle your specific model expects, how many rinse passes it wants, and whether the symptom you noticed is scale, oils, or a failing part. CoffeeBrewsHub publishes a maintenance and troubleshooting library that walks through descaling for espresso machines and pod brewers, splits upkeep into daily, weekly and longer-interval routines, and pairs symptoms such as weak steam, bitter shots or a machine that stops pumping with the likely cause and fix. Read it alongside your own manual, and keep the manual as the authority for your model's specific sequence.
The practical value is in the checklist: a routine that already separates what to do today from what can wait until the weekend, and a symptom-to-cause map so you are not guessing between a descale, a backflush, and a service call.
A descaling routine you can actually keep
Descaling works best as a habit tied to evidence rather than a date you keep postponing.
- Note the date and the number of rinse passes each time you descale. A written log beats memory when a shot starts tasting odd.
- Check flow once a month with a plain water shot. A change in flow is the earliest reliable signal, ahead of taste and well ahead of the light.
- Shorten the interval if your water leaves visible film on the reservoir or if kettles in the same kitchen scale quickly. Lengthen it if you use filtered water and flow stays steady.
- Clean the group and basket on their own schedule. Descaling does not remove coffee oils, and oils do not remove scale.
- Replace the water filter when it is due. A spent filter stops protecting the boiler and can start contributing its own taste.
Do the descale when the machine asks or when flow tells you, whichever comes first. An hour of patient rinsing is a cheap alternative to a heating element that has to be replaced.