Beginner-Friendly Is a Set of Tolerances, Not a Price Bracket
Two machines can cost the same and feel completely different at 7 a.m. on a Tuesday. The difference is how much imprecision each one absorbs before the cup turns sharp, sour, or bitter, and how quickly you can see why.
These are the seven tolerances that decide whether a first machine teaches you or fights you.
- Forgiving puck prep. A basket that tolerates an imperfect distribution keeps the first month encouraging. Deep, narrow baskets and precision-cut filter baskets reward good technique but punish inconsistency. Wider, shallower baskets and pressurised baskets forgive more. Ask what basket the machine ships with and whether a standard replacement basket fits.
- Clear feedback during the shot. You need a way to see what happened: a pressure gauge, a visible flow from the spout, a pre-infusion phase you can watch, a drip tray that shows the volume. Without feedback you are guessing at grind and dose, and guessing is expensive in beans.
- Temperature stability without babysitting. Simple thermostats swing; a PID controller holds a setpoint. On a basic machine you can work around drift by flushing or waiting, but that is a habit you have to learn. Check how quickly the machine reaches temperature and how it recovers between two back-to-back shots.
- Milk steaming you can repeat. A weak wand makes thin foam and takes a long time. A strong wand with a proper tip steams a small pitcher quickly. Automatic frothers remove the skill but limit texture control. Decide whether you want to learn steaming or want it done for you.
- A footprint that suits the counter you actually have. Measure the width, the depth, and the clearance under the cabinets before you buy. Check whether the water tank is at the back or the front, because a rear tank under a low cabinet becomes a daily annoyance.
- Cleaning you will keep doing. Look for a removable drip tray, an accessible group head, a backflush routine, and a descaler you can buy locally. A machine with a long cleaning routine gets cleaned less often than one you can rinse in a couple of steps.
- Parts and help that outlive the warranty. Gaskets, shower screens, baskets, and steam valves wear out. Check that the maker lists spare parts, that the manual is available, and that owners discuss the model in public forums.
In a small kitchen, counter space and cleanup decide more than the spec sheet. A machine that scores well on all seven usually costs more than a first purchase needs to. A machine that scores well on the three or four tolerances that match your routine is the better buy.
The Five Directions Worth Considering
Almost every beginner purchase lands in one of these five groups. None is the best in general; each is the best for a particular routine and appetite for learning.
Entry Manual Lever Machines
A manual lever machine gives you a lever instead of a pump. Some use a spring to build pressure; others rely on your arm. The machine is mechanically simple, which is why it appeals to people who want to understand espresso rather than press a button.
Where it helps. The lever gives physical feedback that no gauge can match. You feel the resistance of the puck, so a coarse grind or a lopsided tamp shows up immediately. There are fewer electronics to fail, the machines are often compact, and routine maintenance is straightforward. Many models are also quiet.
Where it frustrates. Puck prep has to be decent, because nothing hides a bad distribution. Temperature management is manual on simpler models, so you learn to heat the group and time your shots. Steaming may be a separate step or need a separate device, and making several milk drinks in a row is slow.
Best for: one or two espresso drinkers who want to learn by feel, have patience for a slower ritual, and do not need to serve a crowd. Check whether the group is heated, whether a steam wand is included, and whether gaskets and baskets are easy to find.
Budget Semi-Automatic Machines
A budget semi-automatic uses a pump, a portafilter, and a switch or button to start and stop the shot. It is the most familiar shape of home espresso machine, and the price range is wide.
Where it helps. The workflow is easy to understand, replacement parts are common, and the machine can produce genuinely good espresso once the grind and dose are right. It is also the cheapest route into a real portafilter workflow, so the skills transfer if you upgrade later.
Where it frustrates. Temperature control is often crude, steam power is limited, and plastic parts and small drip trays show up as the price drops. Many budget machines ship with a pressurised basket, which produces a respectable-looking shot from a coarse grind but hides the feedback you need to learn. Milk texturing takes practice on a weak wand.
Best for: buyers on a tight budget who mainly drink milk drinks and want a normal counter workflow. Check whether a non-pressurised basket is included or available, what kind of steam wand the machine has, how descaling works, and whether the portafilter and baskets follow a common size so you can buy accessories.
Semi-Automatic Machines With a Built-In Grinder
These machines put the grinder and the brew group in one body. The grinder is matched to the machine, the dose often drops straight into the portafilter, and the whole setup takes one power outlet and one patch of counter.
Where it helps. You buy once instead of assembling a kit, which suits small kitchens and anyone who does not want to research grinders separately. The integrated workflow is fast: grind, level, tamp, pull. It also reduces the chance of buying a grinder that cannot grind fine enough for espresso.
Where it frustrates. The built-in grinder is often the weakest component, and when it fails the whole machine may need service. Swapping beans means emptying a hopper that is awkward to reach, and the grinder is rarely as adjustable as a standalone model. Upgrading later is harder because the two parts are tied together.
Best for: apartment kitchens, single-bean households, and buyers who want one purchase and one footprint. Check the burr type, the number and feel of grind adjustments, whether the grinder can be serviced separately, and whether there is a bypass for pre-ground coffee if you want decaf.
Pod Espresso Machines
A pod machine seals coffee into a capsule and handles the rest. You add water, insert a capsule, and press a button.
Where it helps. Consistency is the whole point. There is no dose to weigh, no grind to adjust, and no puck to knock out. Cleanup is quick, guests can use it without instructions, and the results do not depend on your technique that morning.
Where it frustrates. You give up control over grind, dose, and often temperature. Capsule cost adds up, the selection depends on which ecosystem you chose, and the coffee inside a capsule is sealed rather than fresh. There is little to learn, which is either the appeal or the limitation.
Best for: speed, consistency, and low-effort households, especially where nobody wants to weigh beans. Check which capsule formats the machine accepts, whether third-party capsules exist, how the water tank and drip tray come apart, and whether you need a separate frother for milk.
Entry Super-Automatic Machines
A super-automatic grinds, doses, tamps, brews, and often handles milk with one button. Entry versions are simpler than cafe machines but follow the same idea.
Where it helps. One button produces a drink, milk included. That matters in a household where different people want different drinks, or where the machine has to work before anyone is awake enough to think. The grinder and brewer are integrated, so the whole routine is short.
Where it frustrates. Cleaning is more involved than it looks: brew groups need rinsing, milk systems need flushing, and descaling is not optional. Control over dose and yield is limited, so dialing in a new bean is coarser work than on a semi-automatic. Repair costs are higher, and the footprint is usually larger.
Best for: households with mixed drink preferences and little patience for a routine. Check whether the brew group is removable and rinseable, how the milk system is cleaned, what the service network looks like where you live, and whether there is a bypass for pre-ground coffee.
Side-by-Side on the Criteria That Matter
Direction | Learning curve | Grinder needed | Milk | Cleaning | Best for |
|---|---|---|---|---|---|
Entry manual lever | Steep at first, then intuitive | Yes, separate | Manual or separate | Simple | Learning by feel, small kitchens |
Budget semi-automatic | Moderate | Yes, separate | Manual wand | Simple to moderate | Tight budget, milk drinks |
Semi-automatic with grinder | Moderate | Built in | Manual wand | Moderate | One purchase, small footprint |
Pod espresso | Minimal | None | Separate frother | Easy | Speed and consistency |
Entry super-automatic | Minimal | Built in | Automatic | Involved | Mixed households, low effort |
The Grinder and the Beans Decide More Than the Machine
A machine can only extract what the grinder and the bean give it. Two identical machines fed by different grinders will produce different espresso, and that gap is often larger than the gap between two machines.
Burr grinders, not blade grinders. Burr grinders produce particles of a consistent size, which is what allows even extraction. Blade grinders chop unevenly, so fine dust and coarse chunks extract at different rates and the shot tastes both sour and bitter. If a bundle includes a blade grinder, treat it as a placeholder.
Freshness beats origin claims. Check the roast date on the bag rather than a best-by date. Coffee that was roasted recently releases gas as it rests, which changes how the puck behaves. Very old beans flow unpredictably no matter how well you dial in.
Pressurised baskets hide the lesson. A pressurised basket uses a valve to create back-pressure, so an acceptable-looking shot can come from a coarse grind. That is useful for pre-ground coffee, but it prevents you from learning what grind and dose do. Many beginners keep the pressurised basket for months and then conclude that espresso is inconsistent.
Water is an ingredient. Filtered water reduces scale and keeps the boiler and valves healthy. If your tap water is hard, check what the manufacturer recommends for descaling and whether a filter fits your setup. A cheap hardness test strip tells you more than a marketing claim.
What the First Weeks Actually Feel Like
Expect the first shots to be drinkable only occasionally, and do not read that as a fault in the machine. Dialing in is a loop you repeat with every new bag of beans.
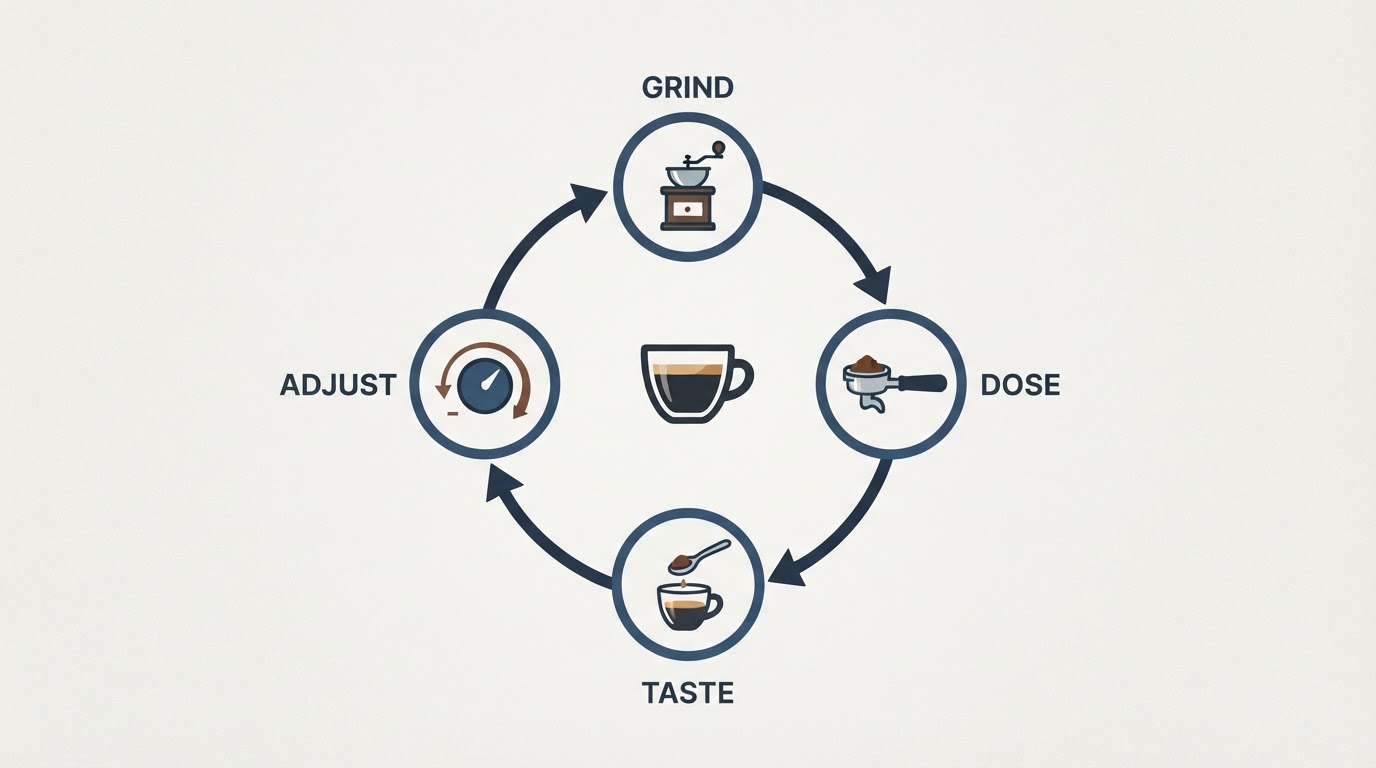
Keep the dose fixed, then change one thing at a time. Grind finer if the shot runs fast and tastes thin or sour; grind coarser if the shot runs slow and tastes bitter or dry. Level the surface of the puck before tamping, and keep the tamp straight. If the flow sprays or gushes from one side, the puck is channelling, and the fix is usually distribution rather than more pressure.
Write down what you changed and what you tasted. A short log turns a frustrating month into a short list of variables you understand. Milk takes its own practice: steam a small pitcher of water with a drop of dish soap a few times to learn the swirl before you spend milk on it.
Temperature drift shows up as a shot that tastes different from the one before it, even with the same grind. Give the machine time to recover between drinks, and if it has no gauge, use the same warm-up routine every morning.
A Starter Shopping Checklist
Use this list before you compare prices.
- Measure the counter width, depth, and clearance under the cabinets.
- Confirm the machine has a non-pressurised basket or that one is available for it.
- Check whether the portafilter and baskets follow a common size, so accessories and spare baskets are easy to buy.
- Decide whether milk steaming is manual, automatic, or needs a separate frother.
- Confirm the water tank is removable and reachable in your kitchen layout.
- Check the drip tray capacity and how it comes out.
- Look for a published cleaning and descaling routine, and confirm you can buy the descaler locally.
- Confirm spare gaskets, shower screens, and steam valves are listed by the maker.
- Budget for a burr grinder and fresh beans, not only the machine.
- Check whether a scale that fits under the spout and a milk pitcher clear the machine.
- Read the manual for warm-up time and recovery between shots.
- Check the warranty length and who services the machine in your country.
- Read owner discussion for recurring failures rather than first impressions.
- Confirm the return window, because a machine that does not fit your counter is not a bargain.
A First-Month Learning Plan
Week 1: build a repeatable routine. Pick one bean, one dose, and one basket. Practice distributing and tamping level, and pull shots without changing anything else. The goal is a puck that looks the same every time, not a perfect shot.
Week 2: learn the grind. Change only the grind setting, one step at a time, and taste each result. Record the setting, the flow you saw, and whether the cup was sour, balanced, or bitter. By the end of the week you should be able to predict which way to move the grinder.
Week 3: add milk. Steam small pitchers, aim for a glossy texture rather than stiff foam, and pour into a spare cup before you commit to a drink. Keep the espresso routine unchanged so you can tell whether a bad drink came from the shot or the milk.
Week 4: add a second bean. Switch beans deliberately, expect to re-dial the grind, and see how quickly you get back to a balanced shot. This is the skill that makes the machine useful long term, because every new bag will ask for it.
Five Beginner Mistakes That Cost Money
- Buying the grinder last. The machine gets the budget and the grinder becomes an afterthought, which caps the quality of every shot. Reserve part of the budget for a burr grinder before you choose the machine.
- Chasing numbers on the box. Pump pressure figures, wattage, and bar claims say little about whether a machine holds temperature or steams well. Spend that attention on the basket, the wand, and the parts list.
- Staying on the pressurised basket. It makes the first week encouraging and the second month confusing. Move to a non-pressurised basket once your grinder can support it.
- Skipping cleaning and descaling. Scale and old coffee oils change flavour and shorten the life of the machine. Put the cleaning routine on the same schedule as your grocery run.
- Upgrading to fix technique. A new machine cannot fix an inconsistent grind or a rushed tamp. Change one variable at a time and give each change a week before you spend again.
FAQ: Best Espresso Machine for Beginners
Is there a genuinely good espresso machine for beginners on a budget?
Yes, if the budget includes a grinder. A simple pump machine with a non-pressurised basket and a separate burr grinder will outperform an expensive machine fed by pre-ground coffee. Expect to compromise on steam power and temperature stability, and check that spare parts exist.
Should a beginner buy a machine with a built-in grinder?
It is a reasonable choice when counter space is tight and you drink one kind of bean. The trade-off is that the grinder is often the weakest part, and a failure can take the whole machine out of service. Check whether the grinder can be serviced separately.
Do you need a professional machine to make real espresso at home?
No. Cafe machines are built for back-to-back service, plumbing, and fast recovery between drinks. A beginner needs repeatability and feedback more than capacity, and a simpler machine with a good grinder is easier to learn on.
Is pod espresso the same as espresso from a portafilter machine?
The drink is concentrated coffee, but you cannot control grind, dose, or much of the extraction. Pod machines win on consistency and speed, and lose on freshness, cost per cup, and the ability to improve with practice.
How much should forum recommendations shape the decision?
Use them to find recurring problems and parts availability, not to pick a winner. A thread that lists the same failure three times is useful; a thread that lists favourites is a starting point for your own shortlist.
Does the model year matter?
Rarely as much as the basket, the steam wand, and the service support. When a maker revises a model, check what changed in the group, the basket, or the steam valve rather than assuming a newer box is better.
A Short Decision Path
Answer four questions and the shortlist is mostly decided.
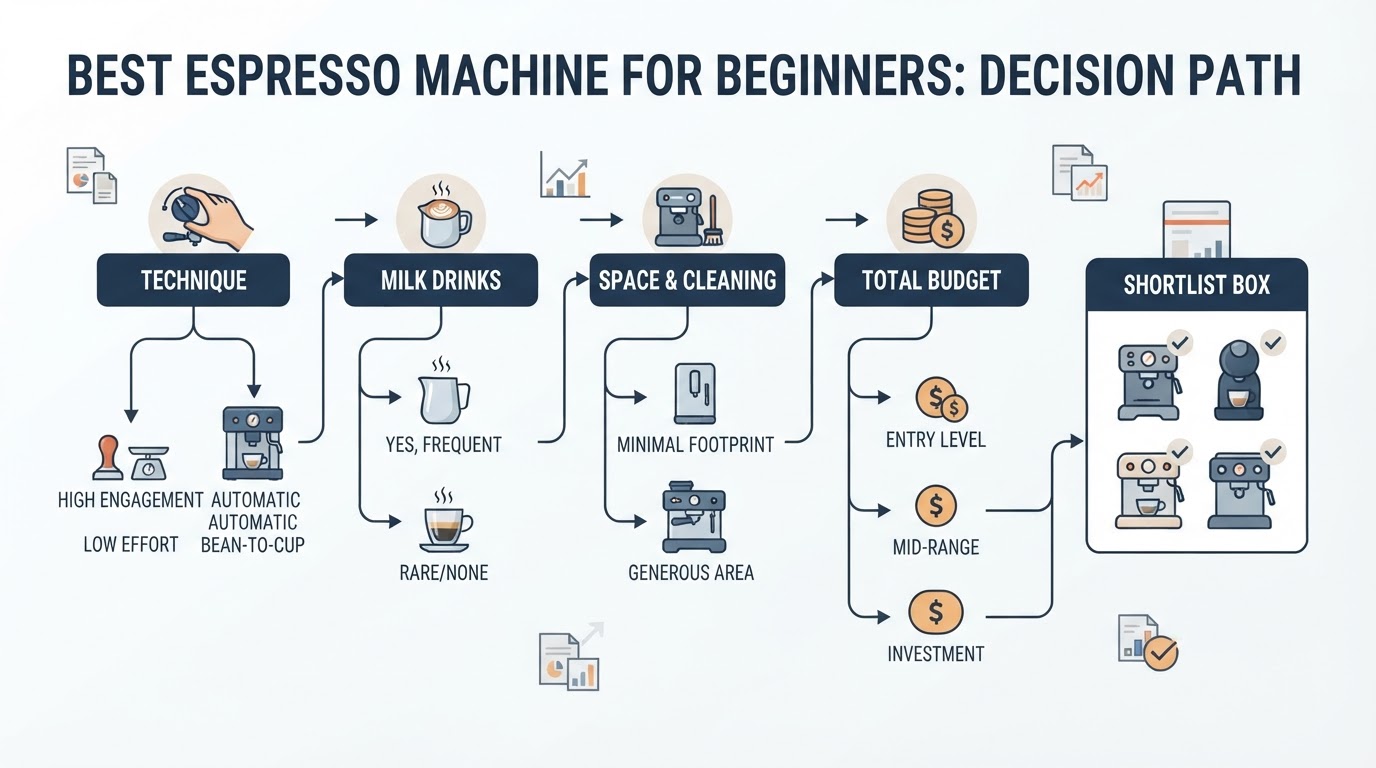
- Do you want to learn technique? If yes, a manual lever or semi-automatic machine gives you feedback and room to improve. If no, a pod or super-automatic machine removes the variables.
- Do you drink milk drinks? If yes, prioritise steam quality or an automatic milk system. If no, spend the budget on the brew side instead.
- How much counter space and cleaning tolerance do you have? A built-in grinder saves space; a super-automatic adds cleaning steps. Be honest about which one you will keep up with.
- What is your total budget, including the grinder and beans? Decide the total before you shop, then allocate enough to the grinder to make the machine worth owning.
The best espresso machine for beginners is the one that keeps you pulling shots after the novelty wears off. Choose the direction that matches your routine, then spend the first month learning the grinder.